| Step 4. Install Media Roll |  |

Insert a media roll |
- Slide locking lever to lock position.
- Press <Power> button on top of TLS PC Link.
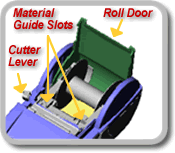
- Open roll door.
- Pressing guide plate lever down, slide and snap it into a notch that matches your media roll width.
- Making sure media unwinds from top, snap media roll firmly into cradle.
- Feed leading edge of media roll through material guide slots until it meets resistance.
- Press <Feed> button on top of TLS PC Link. (Continue to manually push media roll edge until it catches).
- Press <Function> to vertically align media so that top of label is in print postion.
| |
Remove a media roll | |
- Cut off printed media with cutter lever.
- Open roll door.
- Slide locking lever to unlock position.
- Back media out of material guide slots.
| |

 Add TLS2200 to quote to see pricing.